penne with roast cauliflower, burnt onion and salami
Cuisine Italian
Prep Time 10 minutesminutes
Cook Time 15 minutesminutes
Total Time 25 minutesminutes
Servings 2people
Author Gary @ BigSpud
Ingredients
1/2onion
1/2headcauliflower
1teaspoonfennel seeds
5slicessalamiroughly chopped
1clovegarliccrushed
200gmascarpone
200gpenne
parmesangrated to taste
Instructions
Get a frying pan on very hot. Get a pan of salted water on to boil.
In a baking tray, break up the cauliflower to even-sized florets. With a blowtorch caramelize the cauliflower on all sides. (If you don't have a blowtorch, put in a hot oven for 30 minutes before continuing.
Get your pasta and the caramelized cauliflower together on to boil, but stop it one minute short of done - you'll finish cooking it in the sauce. Make sure you also save a mugful of the cooking water when it's nearly done, the starchiness will help make a binding sauce.
Break the onion into leaves into the pan. Don't stir them around, but leave them to sit until they start to burn one side. When this happens, add in the fennel seeds and toss gently. After another minute add a splash of olive oil, salami and garlic.
After another minute of stir frying add a splash of the cooking water and the mascarpone. Stir thoroughly to break down the cheese, then add the pasta and cauliflower. Add a little more cooking water if it needs slaking - you want a consistency approaching single cream. Season to taste and serve, finishing with parmesan.
If you don’t follow Gennaro Contaldo on Instagram, you’re missing out. He posts great food all the time. When he posted a picture of a lunch time special, I had to make it. He didn’t really describe a recipe so here’s my recipe for a green pesto penne inspired by Gennaro Contaldo.
A post shared by Gennaro Contaldo (@gennarocontaldo) on
Since employing Jamie Oliver in the Neal Street restaurant in the 1990s, the two have always had a close relationship. Gennaro looks on him like a son, and Jamie gives him credit for properly teaching him Italian cuisine. Hence, Gennaro has a mentor / ambassadorial role at Jamie’s Italian, roaming their branches spreading his love and knowledge of Italian food. What joy he must bring to their kitchens, with his infectious attitude and heavily accented English. I love him when he’s on TV, and he was just as genial when I met him in 2016.
Pesto is a great catch-all recipe and this spring pesto penne recipe is a good store cupboard standby. This recipe brings together great produce and turns it into a veg-packed sauce that glows with goodness. You could easily substitute the mint for another leafy one, or swap whatever greens you have on hand. Just blanch as needed to tenderise or quieten harsh flavours. Don’t skip the ricotta, the nutty creaminesss is a perfect foil to the herby flavours.
Apart from baking the ricotta, the whole thing can be done in under 15 minutes so is a great weekday dinner.
Preheat the oven to 200C. Line a baking tray with baking paper. Put the ricotta on this, drizzle with olive oil, grate over the zest of half a lemon, sprinkle with salt and a pinch of oregano. Bake for 30 mins or until tinged brown at the edges.
Get a large pan of salted water on to boil. When boiling furiously, add the spring onions, courgette and leek and blanch for two minutes to take the harsh notes out of the onion and start tendering the veg. Don't discard the water, now use it to cook your pasta.
While the pasta cooks, add the veg, mint, pine nuts, a swig of extra virgin olive oil and a large pinch of salt to a food processor and blitz to pieces. When everything is broken down, trickle in some more oil to make a paste. Stop the motor and grate in plenty of parmesan, lemon juice and a big splash of the pasta cooking water. Taste and add more salt, lemon or oil as required until you have a loose sauce.
When the pasta is cooked, drain and return to the pan. Toss the sauce with the pasta until well-coated. Serve in bowls, garnishing with rough chunks of baked ricotta, pine nuts and parmesan.
Here’s a quick round-up of things I’ve been up to in and out of the kitchen lately…
Gennaro Contaldo and Bertolli With Butter
Just a few days after chatting with Antonio Carluccio, this hungry Essex boy met up with the other greedy Italian Gennaro Contaldo. At a stall in Spitalfields he was cooking using Bertolli With Butter.
He was using this new cute trumpet-shaped pasta which caught the butter-rich sauces perfectly.
He was lots of fun. I tried cooking with Bertolli With Butter and the pasta myself; it was extremely tasty when simply fried with vegetables in a little butter.
While I was with Gennaro I couldn’t resist grabbing a quick photo!
Sturgeon Pate from the Fish Society
I was sent some of this sturgeon fish pate try, in original and smoked varieties. The Fish Society are the sole UK importers of the pate (starting at £5.40 per tin) and can deliver anywhere in the UK next day.
I have to admit, it wasn’t my cup of tea. The flavour was quite strong and didn’t do it for me. But I’m sure you have fish-fancying friends in your family that would enjoy it. Check The Fish Society if this is up your street.
Heinz Seriously Good Mayo
Heinz have launched a new mayo with the title “seriously good”. It’s a very good mayo; tangy but completely creamy. Even the ‘light’ version is very enjoyable. I was invited to an event to crown the winner of a canape competition, each one of course using mayo in the recipe. Domestic Gothess won with her crispy coconut prawn, but personally I fell in love with Helen’s salmon ceviche. Utterly divine!
With recipes ranging from potato salads to coronation chicken, from brownies to muffins, the event really showed off what a great ingredient mayo can be. Heinz’s new offering is definitely one I’ll be keeping in my cupboards.
Tayyabs
Nestled away in what feels like a back-alley of London’s Whitechapel is a three-storey Indian restaurant serving mind-blowing food. I’ve been a bunch of times but I just had to write about it. Their lamb chops are the stuff of legend. This picture is awful because it’s quite dark in there and to be frank I just wanted to demolish them:
Sizzling on a hotplate within minutes of ordering come four gnarled, meaty, charred hunks of meat, flecked with zing and spice. With a little mint raita on the side they are just perfect. I could eat them all day long. Alongside some creamy daal, seekh kebab, pakora and roti two of us ate for under £20. Ridiculous value.
I’m ending with an amazing find. Barely a week goes by without a version of pizza being eaten in my house so I’ve tried all sorts of pizzas at restaurants, ready-made at home and every recipe you can conjure up. After a recommendation from a colleague I’ve found the one. Just as good as any restaurant pizza you care to name, the pizza base from Crosta & Mollica comes topped with tomato sauce and cooks in 8 minutes. The flavour of the dough is sensational, crisp yet chewy with plenty of deep savoury flavour. All I added to mine was some fresh mozzarella and it was absolutely perfect.
This guest post is something a little different: a recipe from a qualified chef! Here’s Chris’s recipe for batch cooked bolognese. Here’s Chris’s tips in one handy infographic! Over to you Chris…
Before we get started, let me take a few moments to introduce myself; my name is Chris, i’ve known Gary for about 6 or 7 years now and enjoy a meeting of minds on both food and technical subjects. We regularly have family get togethers where we take it in turns to cook a meal and chat about the topic of the day. Our girls play together, in their own little world as 6 year old girls tend to do. Here’s a pic and me and my little bundle of joy.
I myself started life as a chef, spending 3 years at the Westminster School or Catering before spending another 3 working my way through various levels of the industry, developing my love of food.
I’ve always been rather intrigued by bigspud.co.uk so was thrilled when Gary invited me to write a guest piece for him.
Now what to write about……?
My wife and I do our best to steer clear of convenience foods on the whole, which leads us to do a lot of batch cooking. We’ll make 40 helpings of curry/bolognese/stew then freeze portions individually, giving us a tasty and nutritious meal in a snap. I recently completed one of these batch cooking sessions and thought I’d document the process to pass on a few tips and tricks.
So, having said all that, lets get cracking with batch cooked bolognese. Bear in mind this isn’t a recipe with an ingredients list and a method – if the truth be known nothing I cook is, I tend to be a “throw it together and see what happens” type of cook ;o) – but should be looked at as rather an overview of the process with a few tips highlighted along the way.
Tip #1: Make a lot
The process can take a while, so use the time well and make at least double your usual amount.
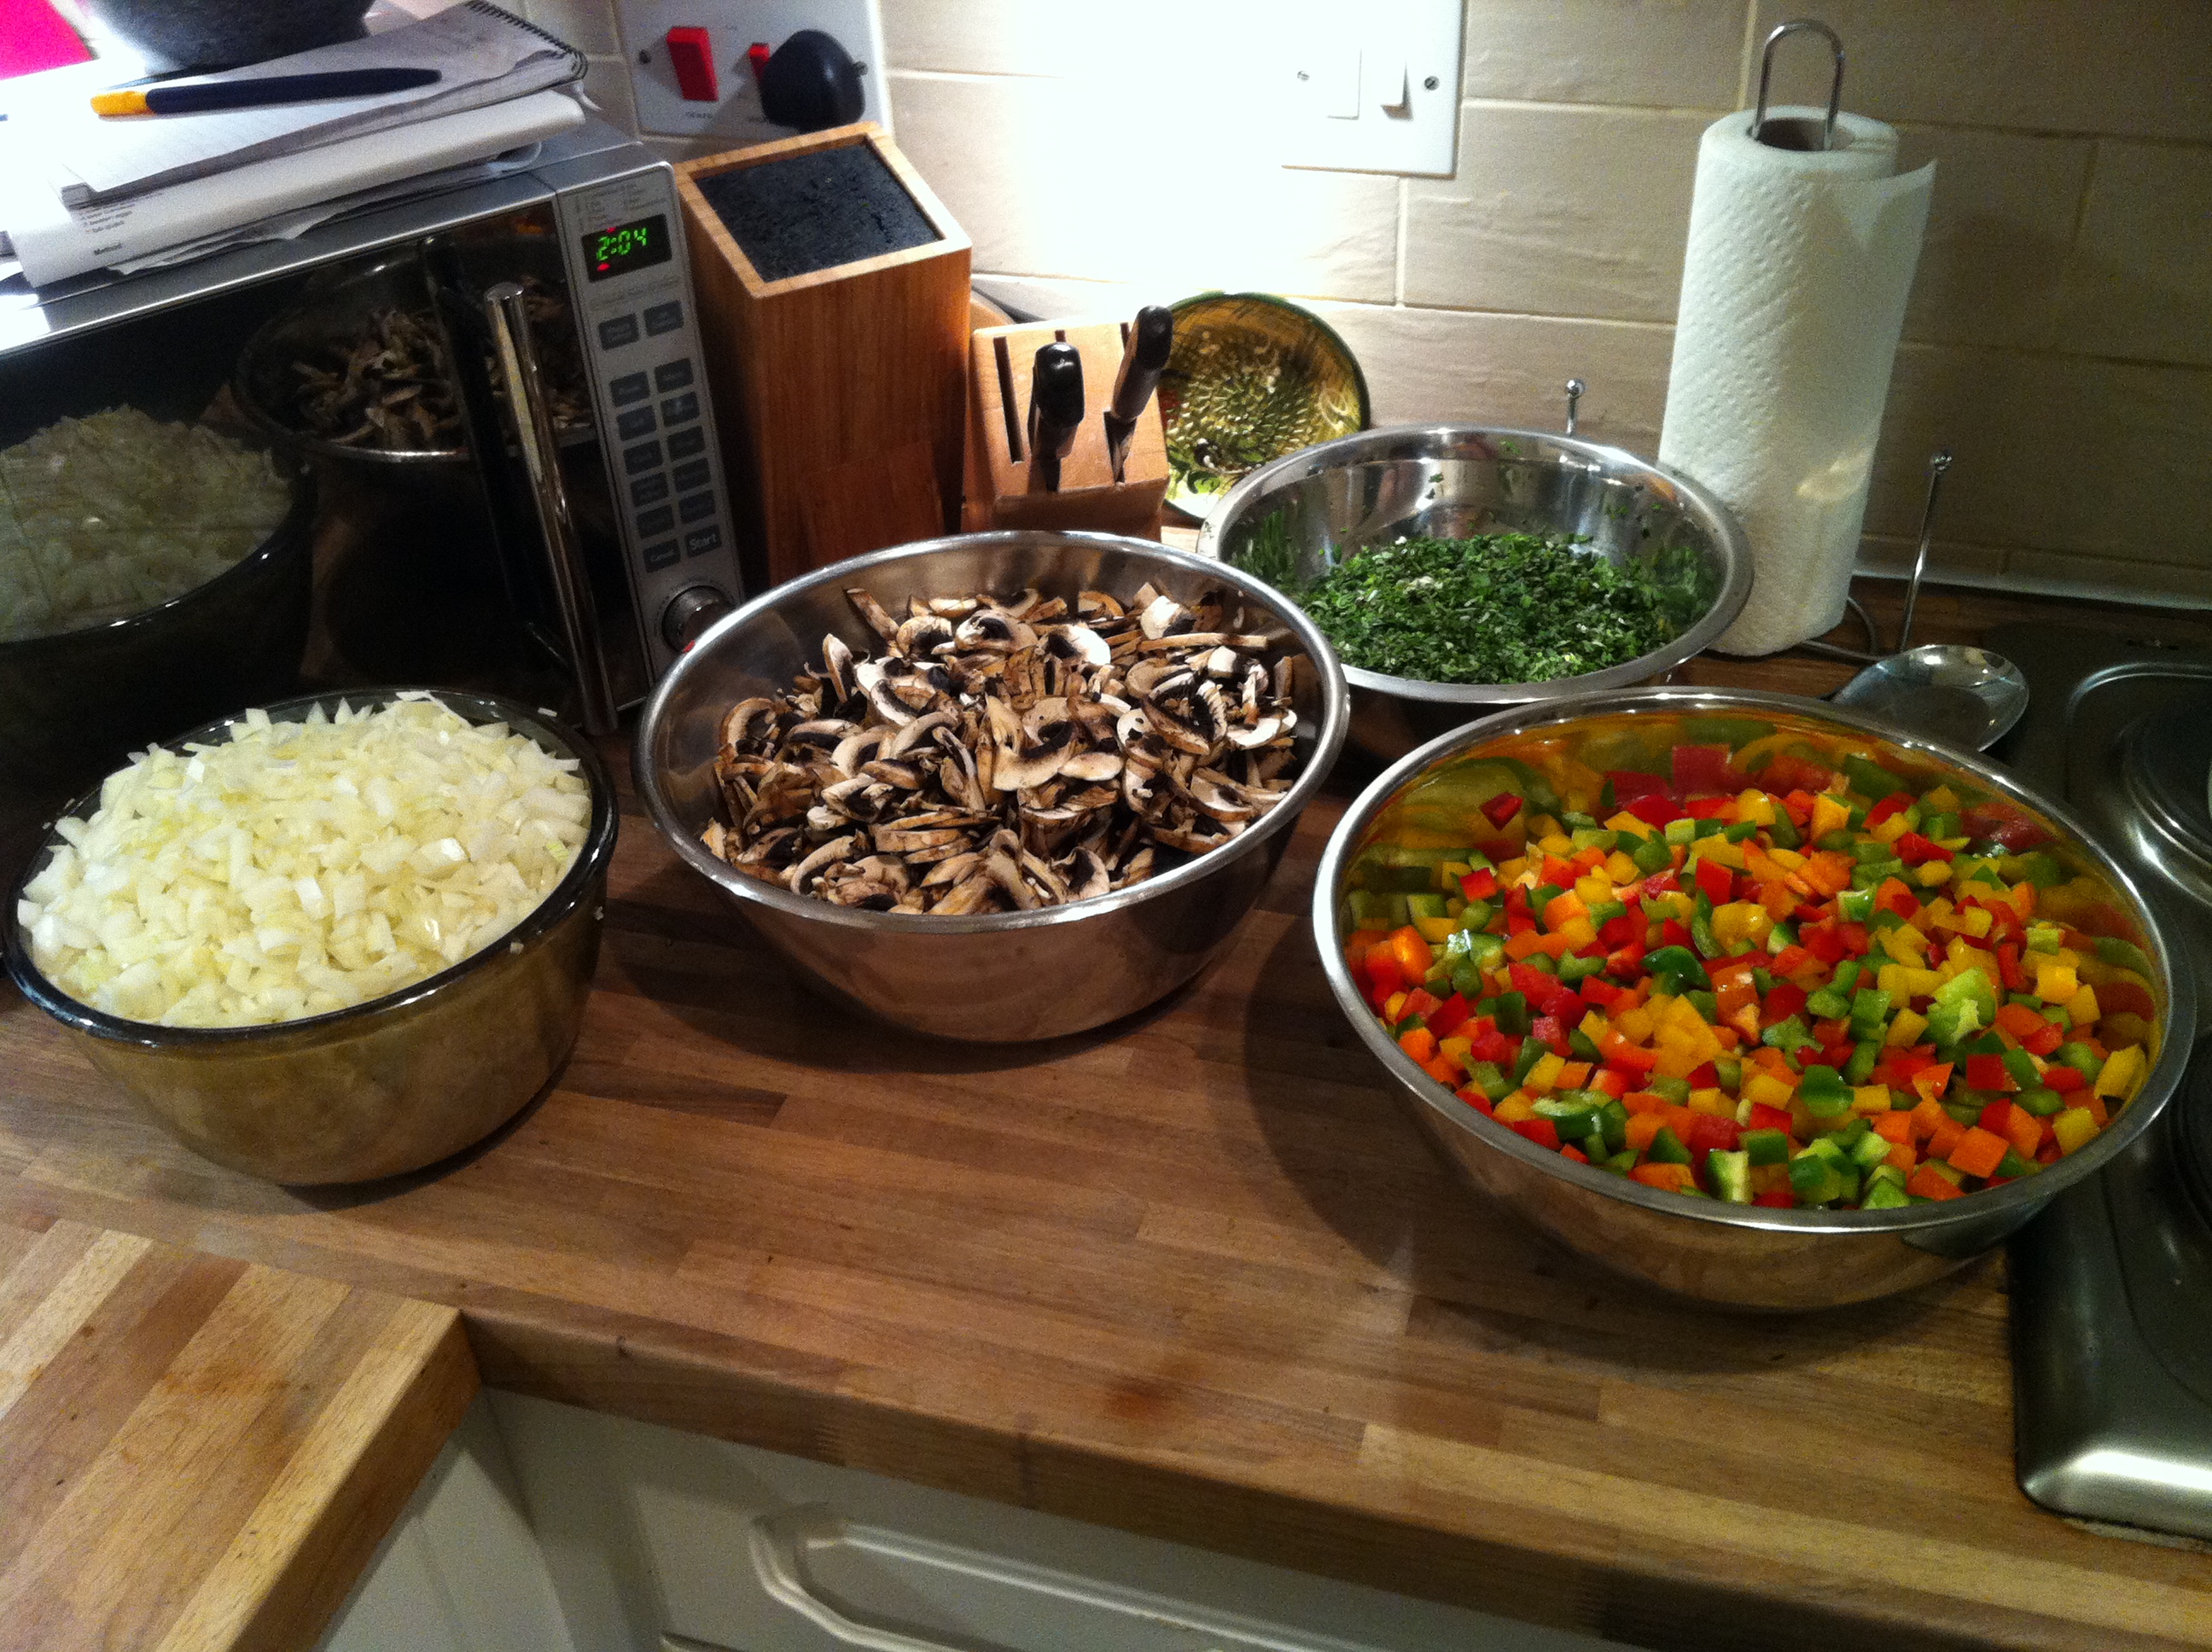
So….first of all, we start with some veg…..
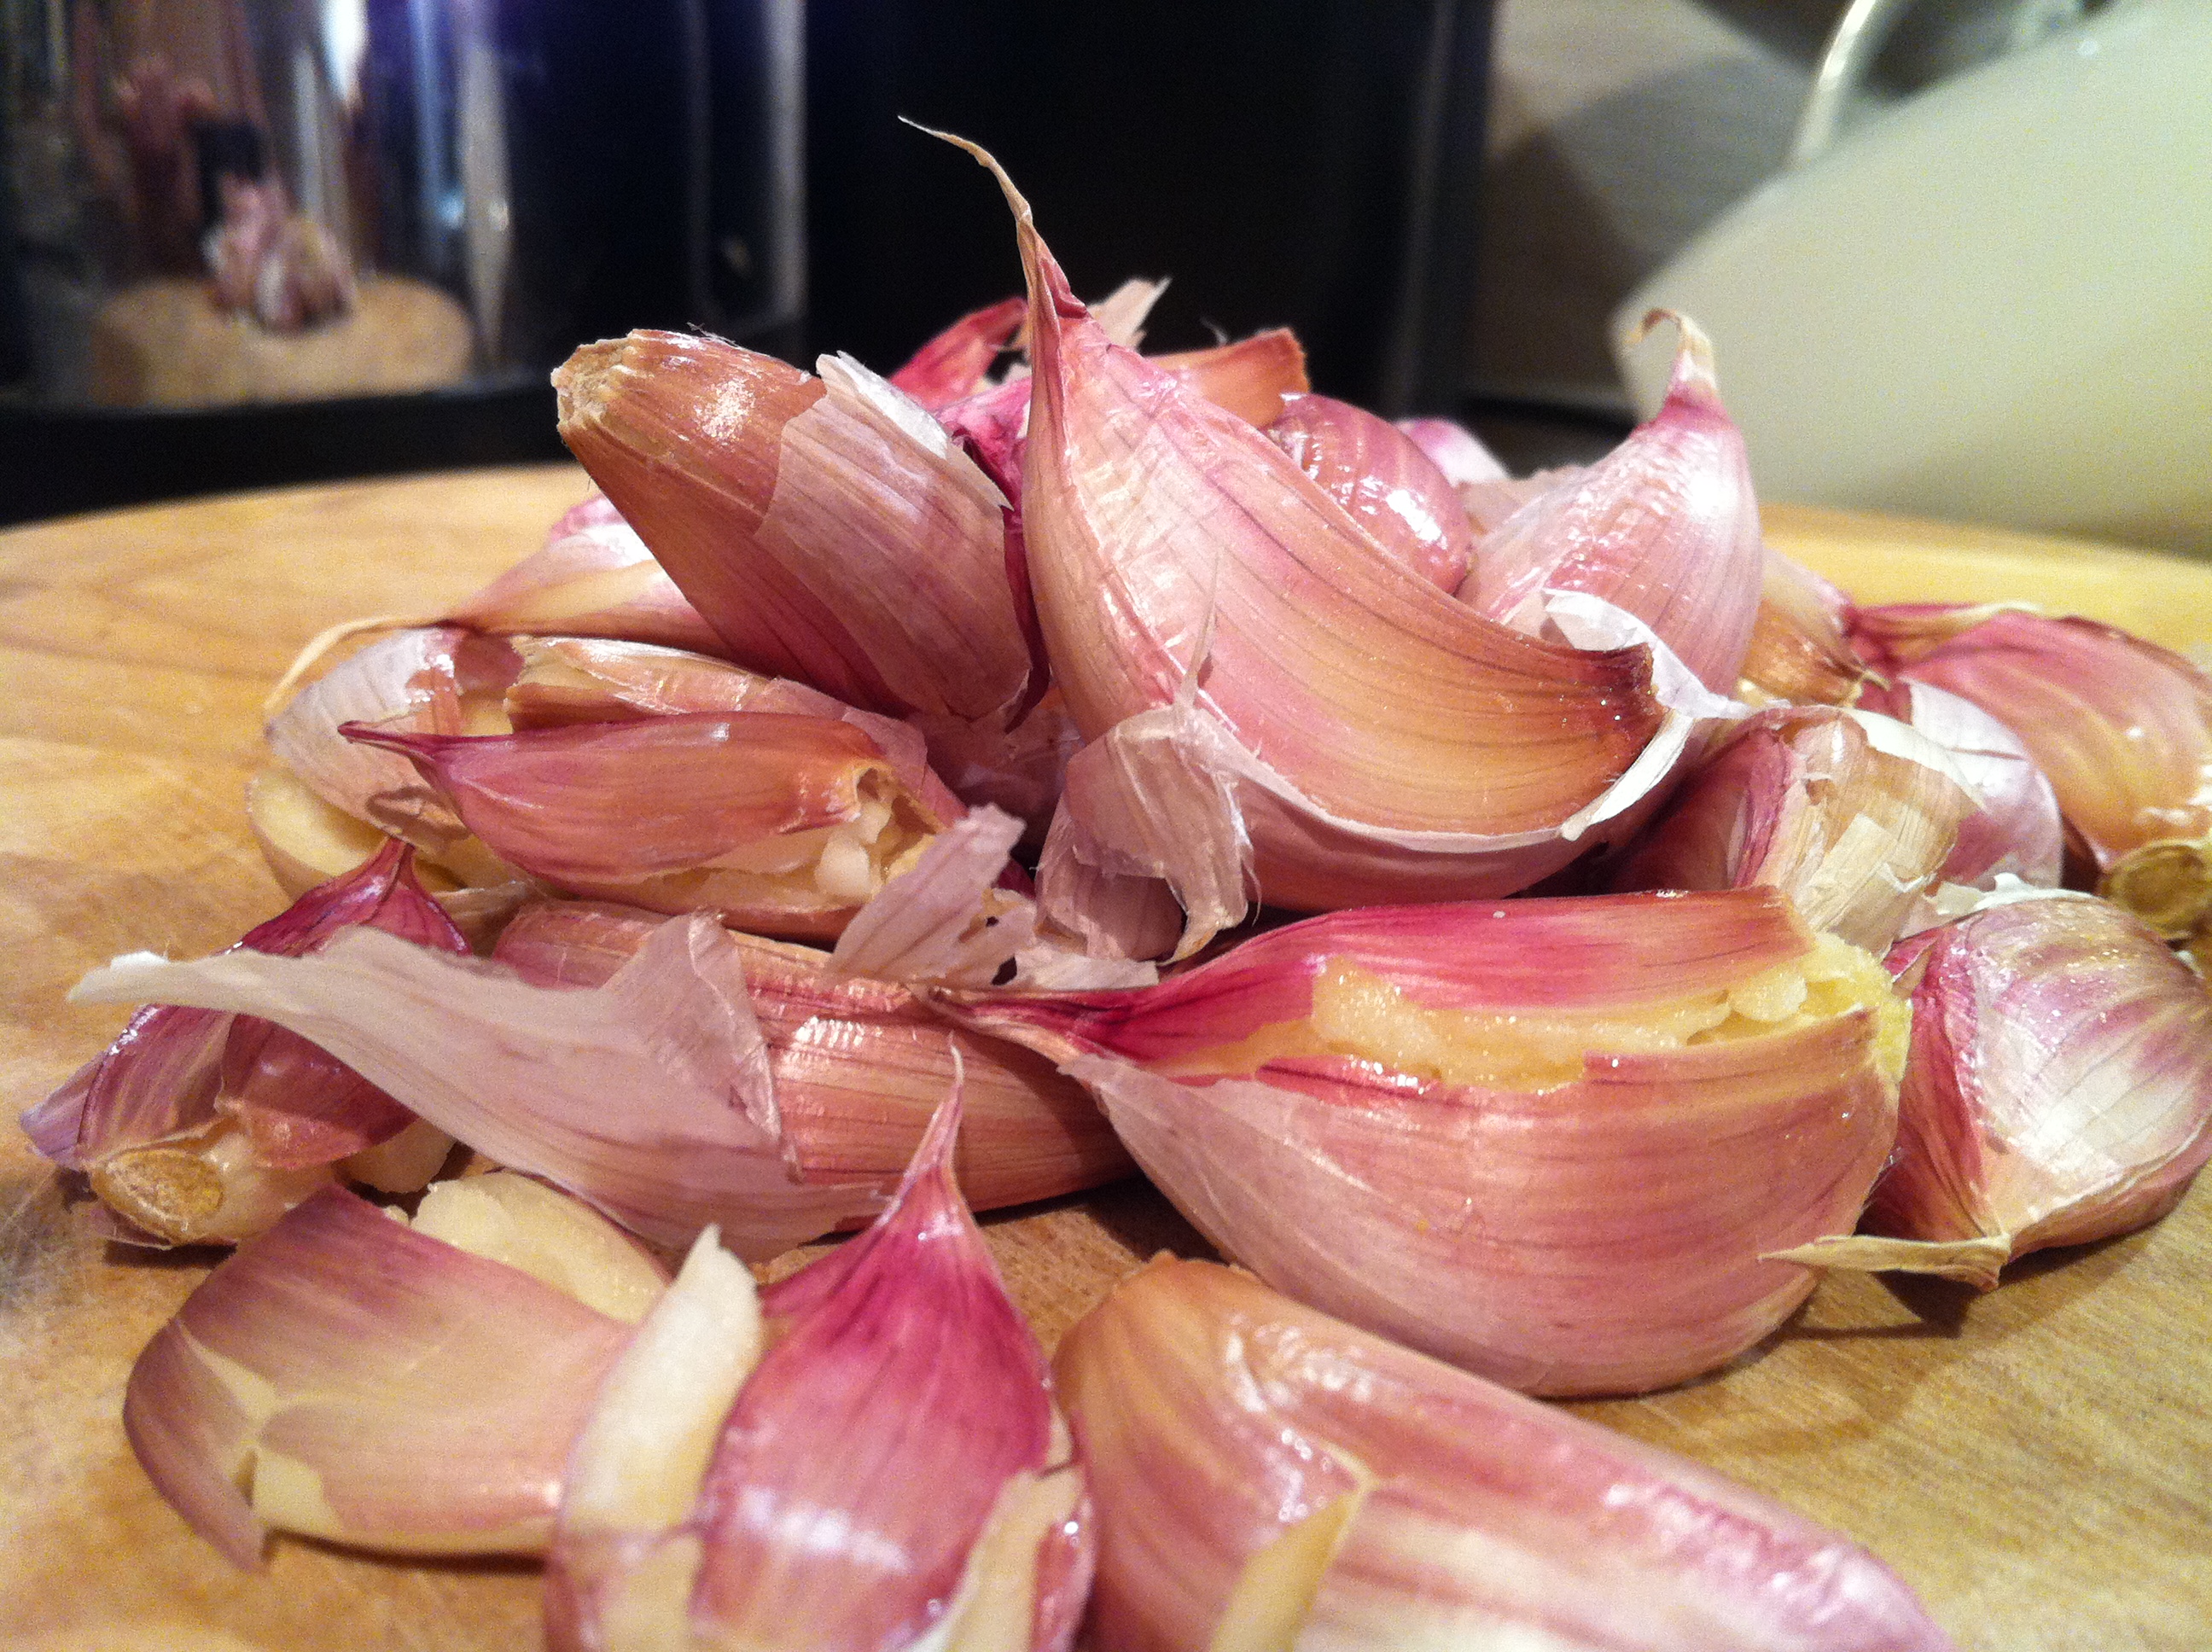
We have about 7 onions, 9 peppers, a couple of bunches of parsley, a couple of bunches of basil, a couple of heads of garlic and a large box of mushrooms.
Tip #2: Always use fresh herbs
Always always use fresh herbs. Dried herbs will always taste that way – dried!
Also don’t cook your herbs, wait until the very last knockings of the cooking process before you add them. Herbs are delicate plants with delicate flavours, if you put them into your sauce too early, they will cook too much and lose a lot of their impact on the senses.
Here’s some arty shots to show the amount of garlic and meat that went in.
Right, now to some cooking; all the veg goes into the biggest saucepan we have, in our case we use an old jam making saucepan my wife inherited from her grandmother. Due to the amount being cooked, the veg takes a good 20 minutes to sweat off.
While the veg is sweating off we fry the meat. There’s about 1.5kg of beef mince. This frying process sears the meat and builds lovely browned flavours, so shouldn’t be skipped.
Fry the meat as hot as possible and never overload your frying pan.
You want to sprinkle your mince meat into your smoking hot frying pans so it forms a single layer. Once you’ve added it to your pan, leave it alone for a good few minutes. The more you poke and prod the meat at this stage, the more heat you knock out of your frying pan. If your frying pan isn’t hot enough you will end up boiling your mince in it’s own juices and no-one likes boiled mince…
Tip #3: Use more pans to save time
Don’t be afraid to use every frying pan that will fit on your hob at this stage. The most important thing is not to overload your pan.
Once the meat is fried, pour it into a colander over a bowl, until you’re ready to add it back into the main saucepan. This will allow excess fat to drain away.
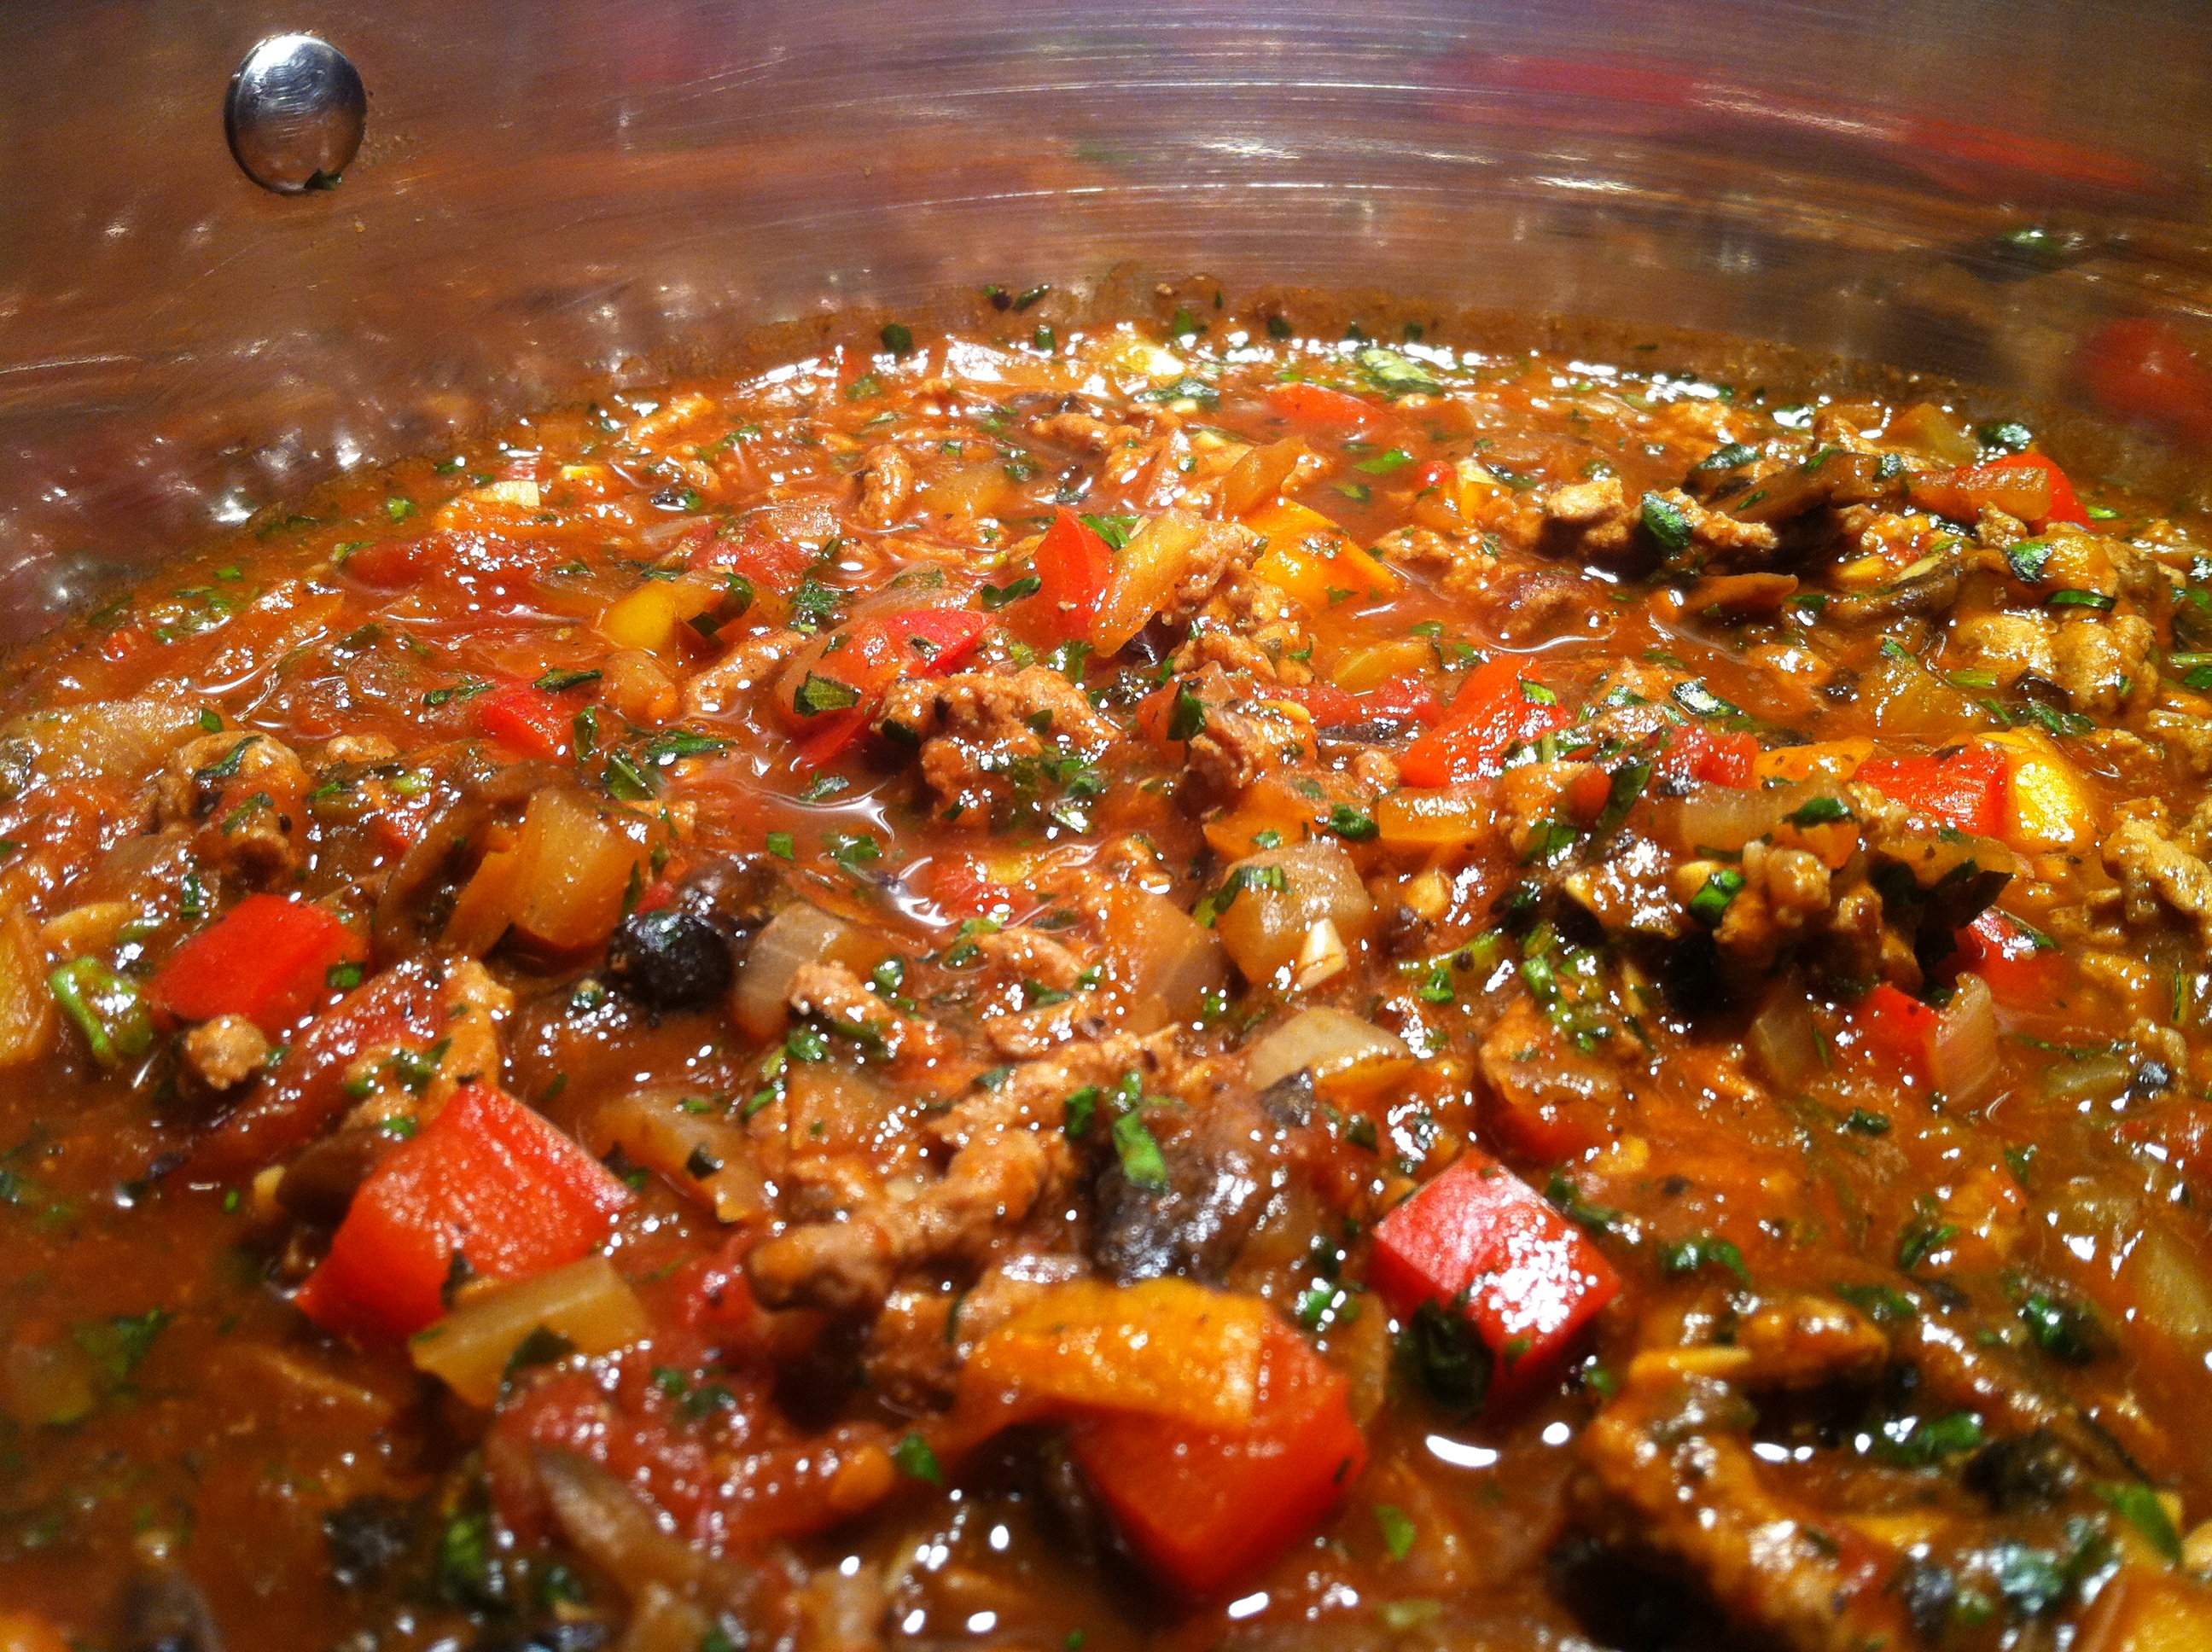
When you’ve finished browning your meat, your veg should be sweated off enough and it’s time to get to the sauce.
Tip #4: Max the flavour to survive freezing
Freezing can kill off the flavours, so use plenty of seasoning to counteract it.
The approximate ingredients for my sauce are 7 tins of tomatoes, half a bottle of Lea & Perrins Worcestershire sauce, a tube of tomato puree, a couple of generous desert spoons of Bovril, half a bottle of wine and 8 stock cubes.
Stick all that lovely flavour into the pan with the veggies and bring to the boil. Now add the meat and any juices you’ve collected in the bowl, give everything a good mix and reduce to a simmer. Leave that to simmer for about 2 hours, stirring occasionally, then, just before you are going to take it off the heat, stir in those lovely fresh herbs. Mmmm, my mouth is watering as I type….
Tip #5: Cool it quick
In industrial kitchens there are devices called ‘blast chillers’. They are basically large cabinets which blow chilled air over whatever you put in them to cool the food down ASAP. I mimic this blast chilling idea at home with a desktop fan and a baking tray. The baking tray maximises the surface area of the bolognese, so as much of the sauce has cold air touching it, and giving it a good stir every few minutes shortens the chilling time as well.
You might also think about setting this rig up in the coldest part of your house, a conservatory or larder works great.
Ok, so we’ve cooked our sauce and are ready for storage.
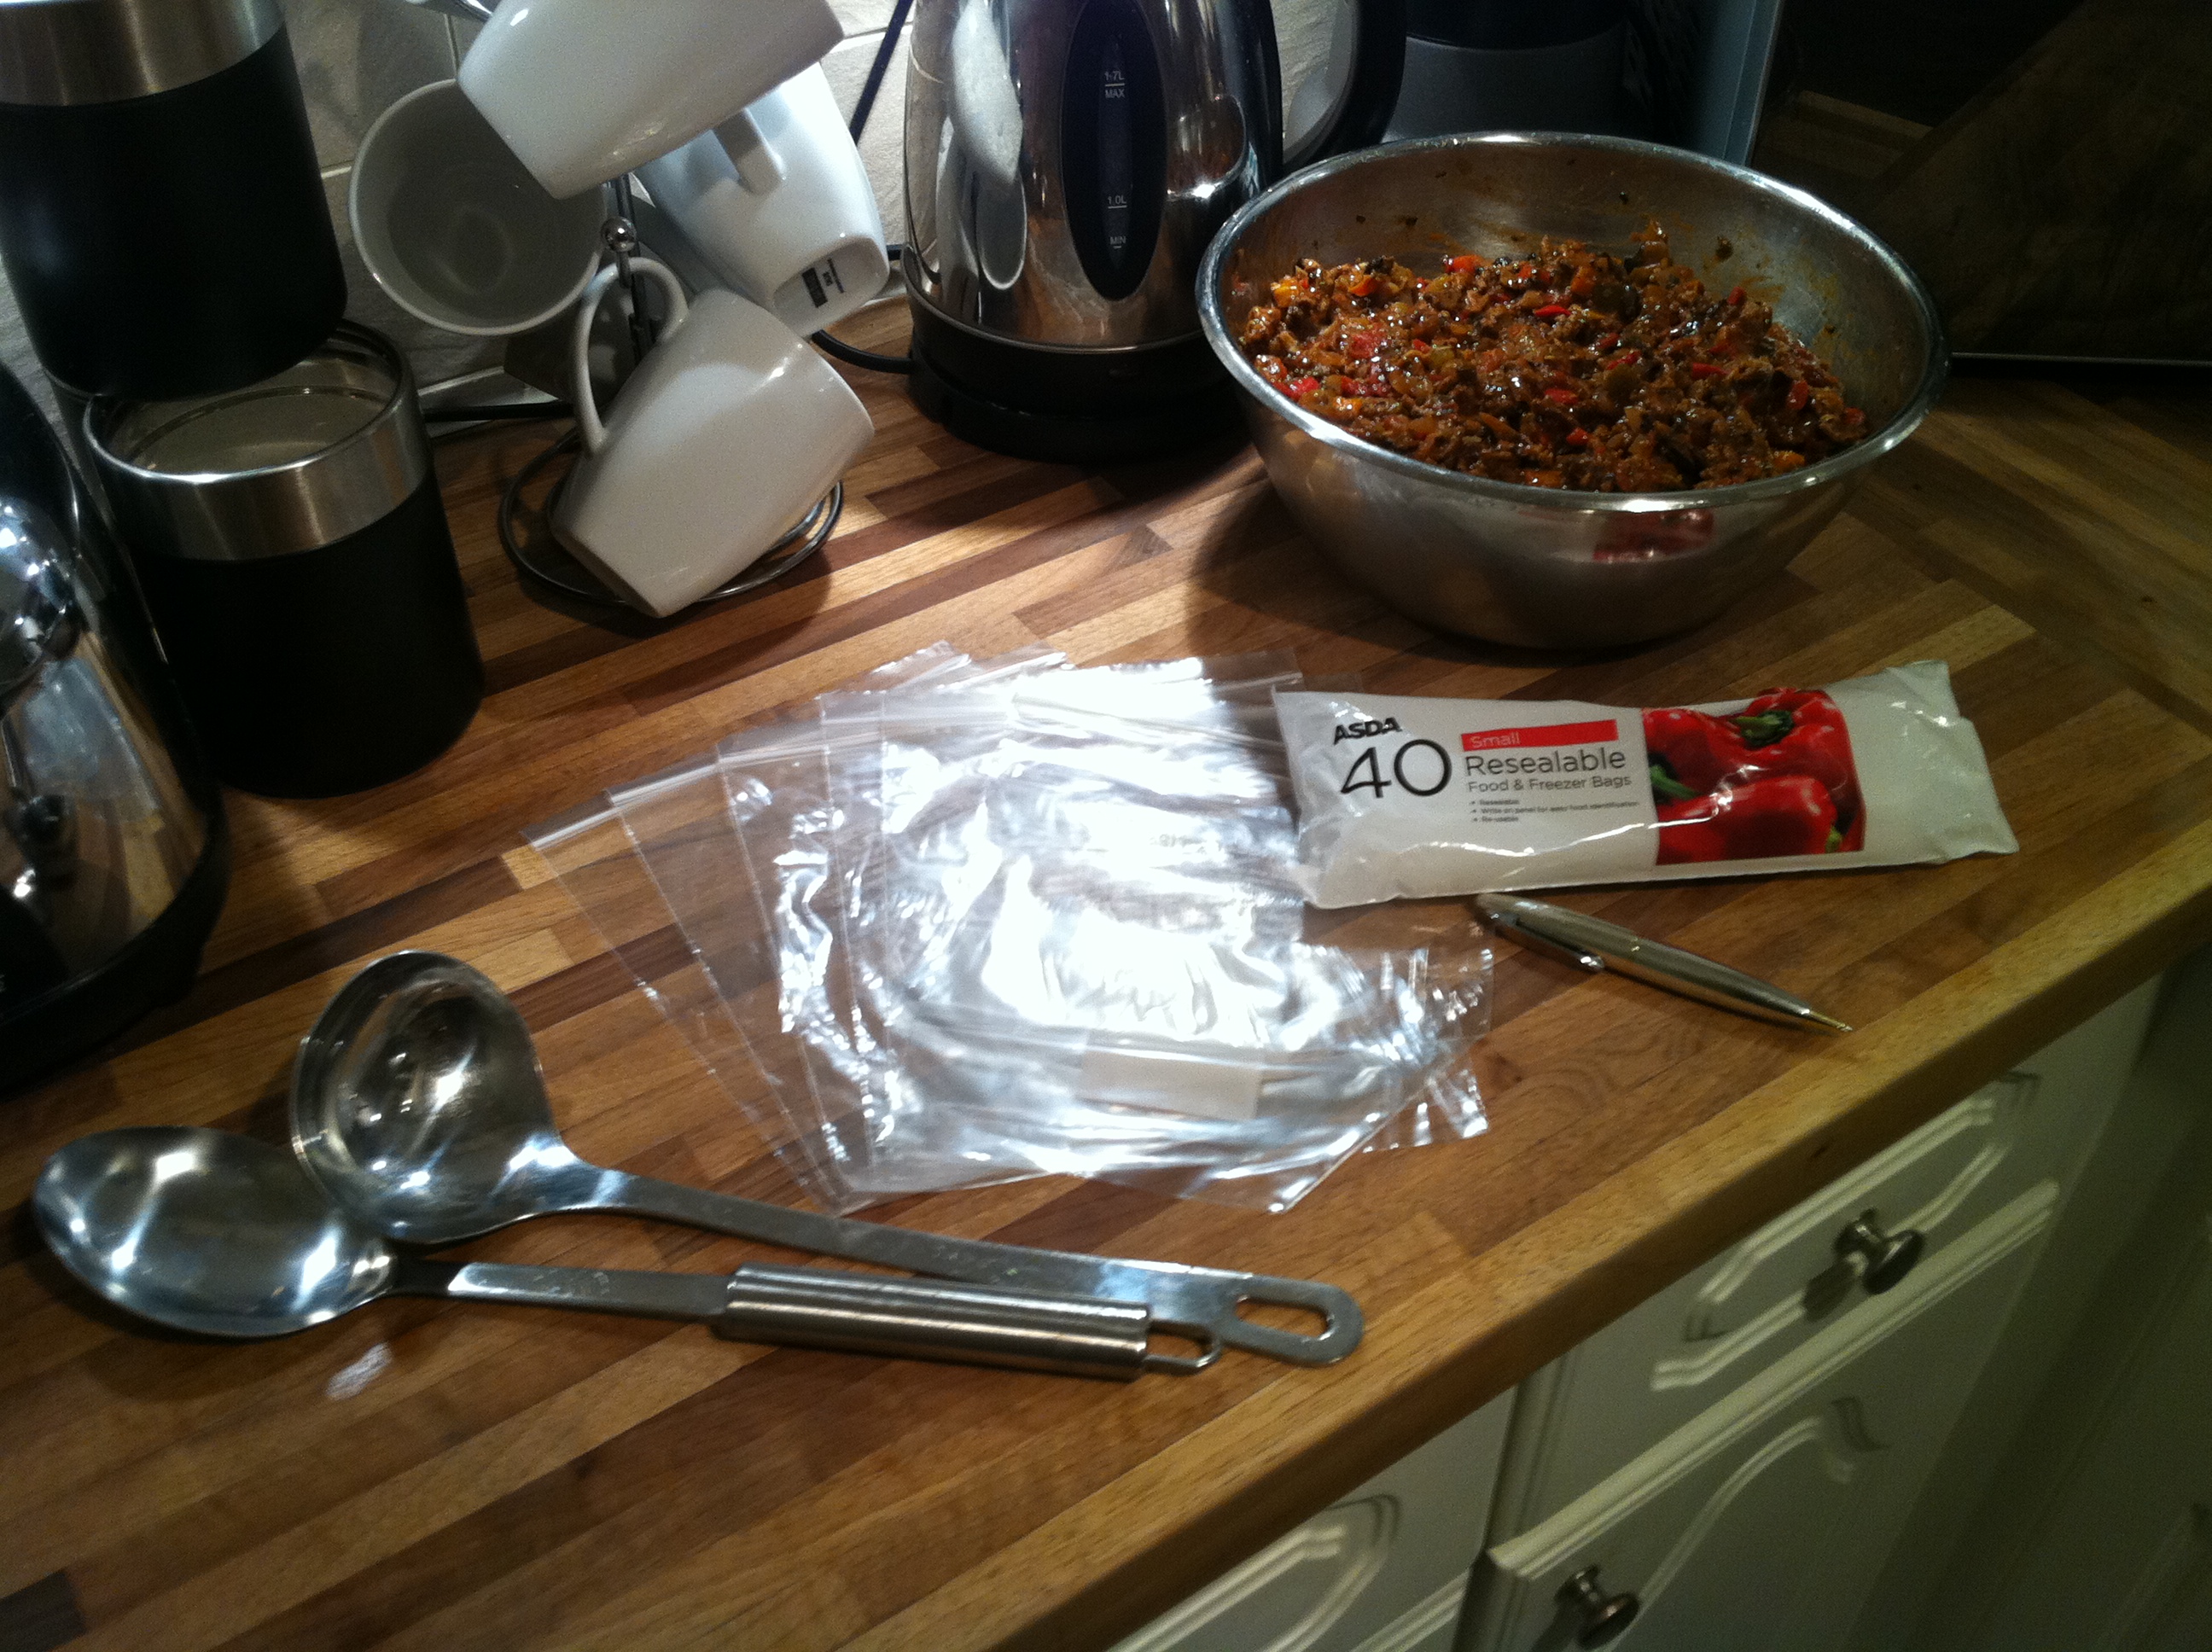
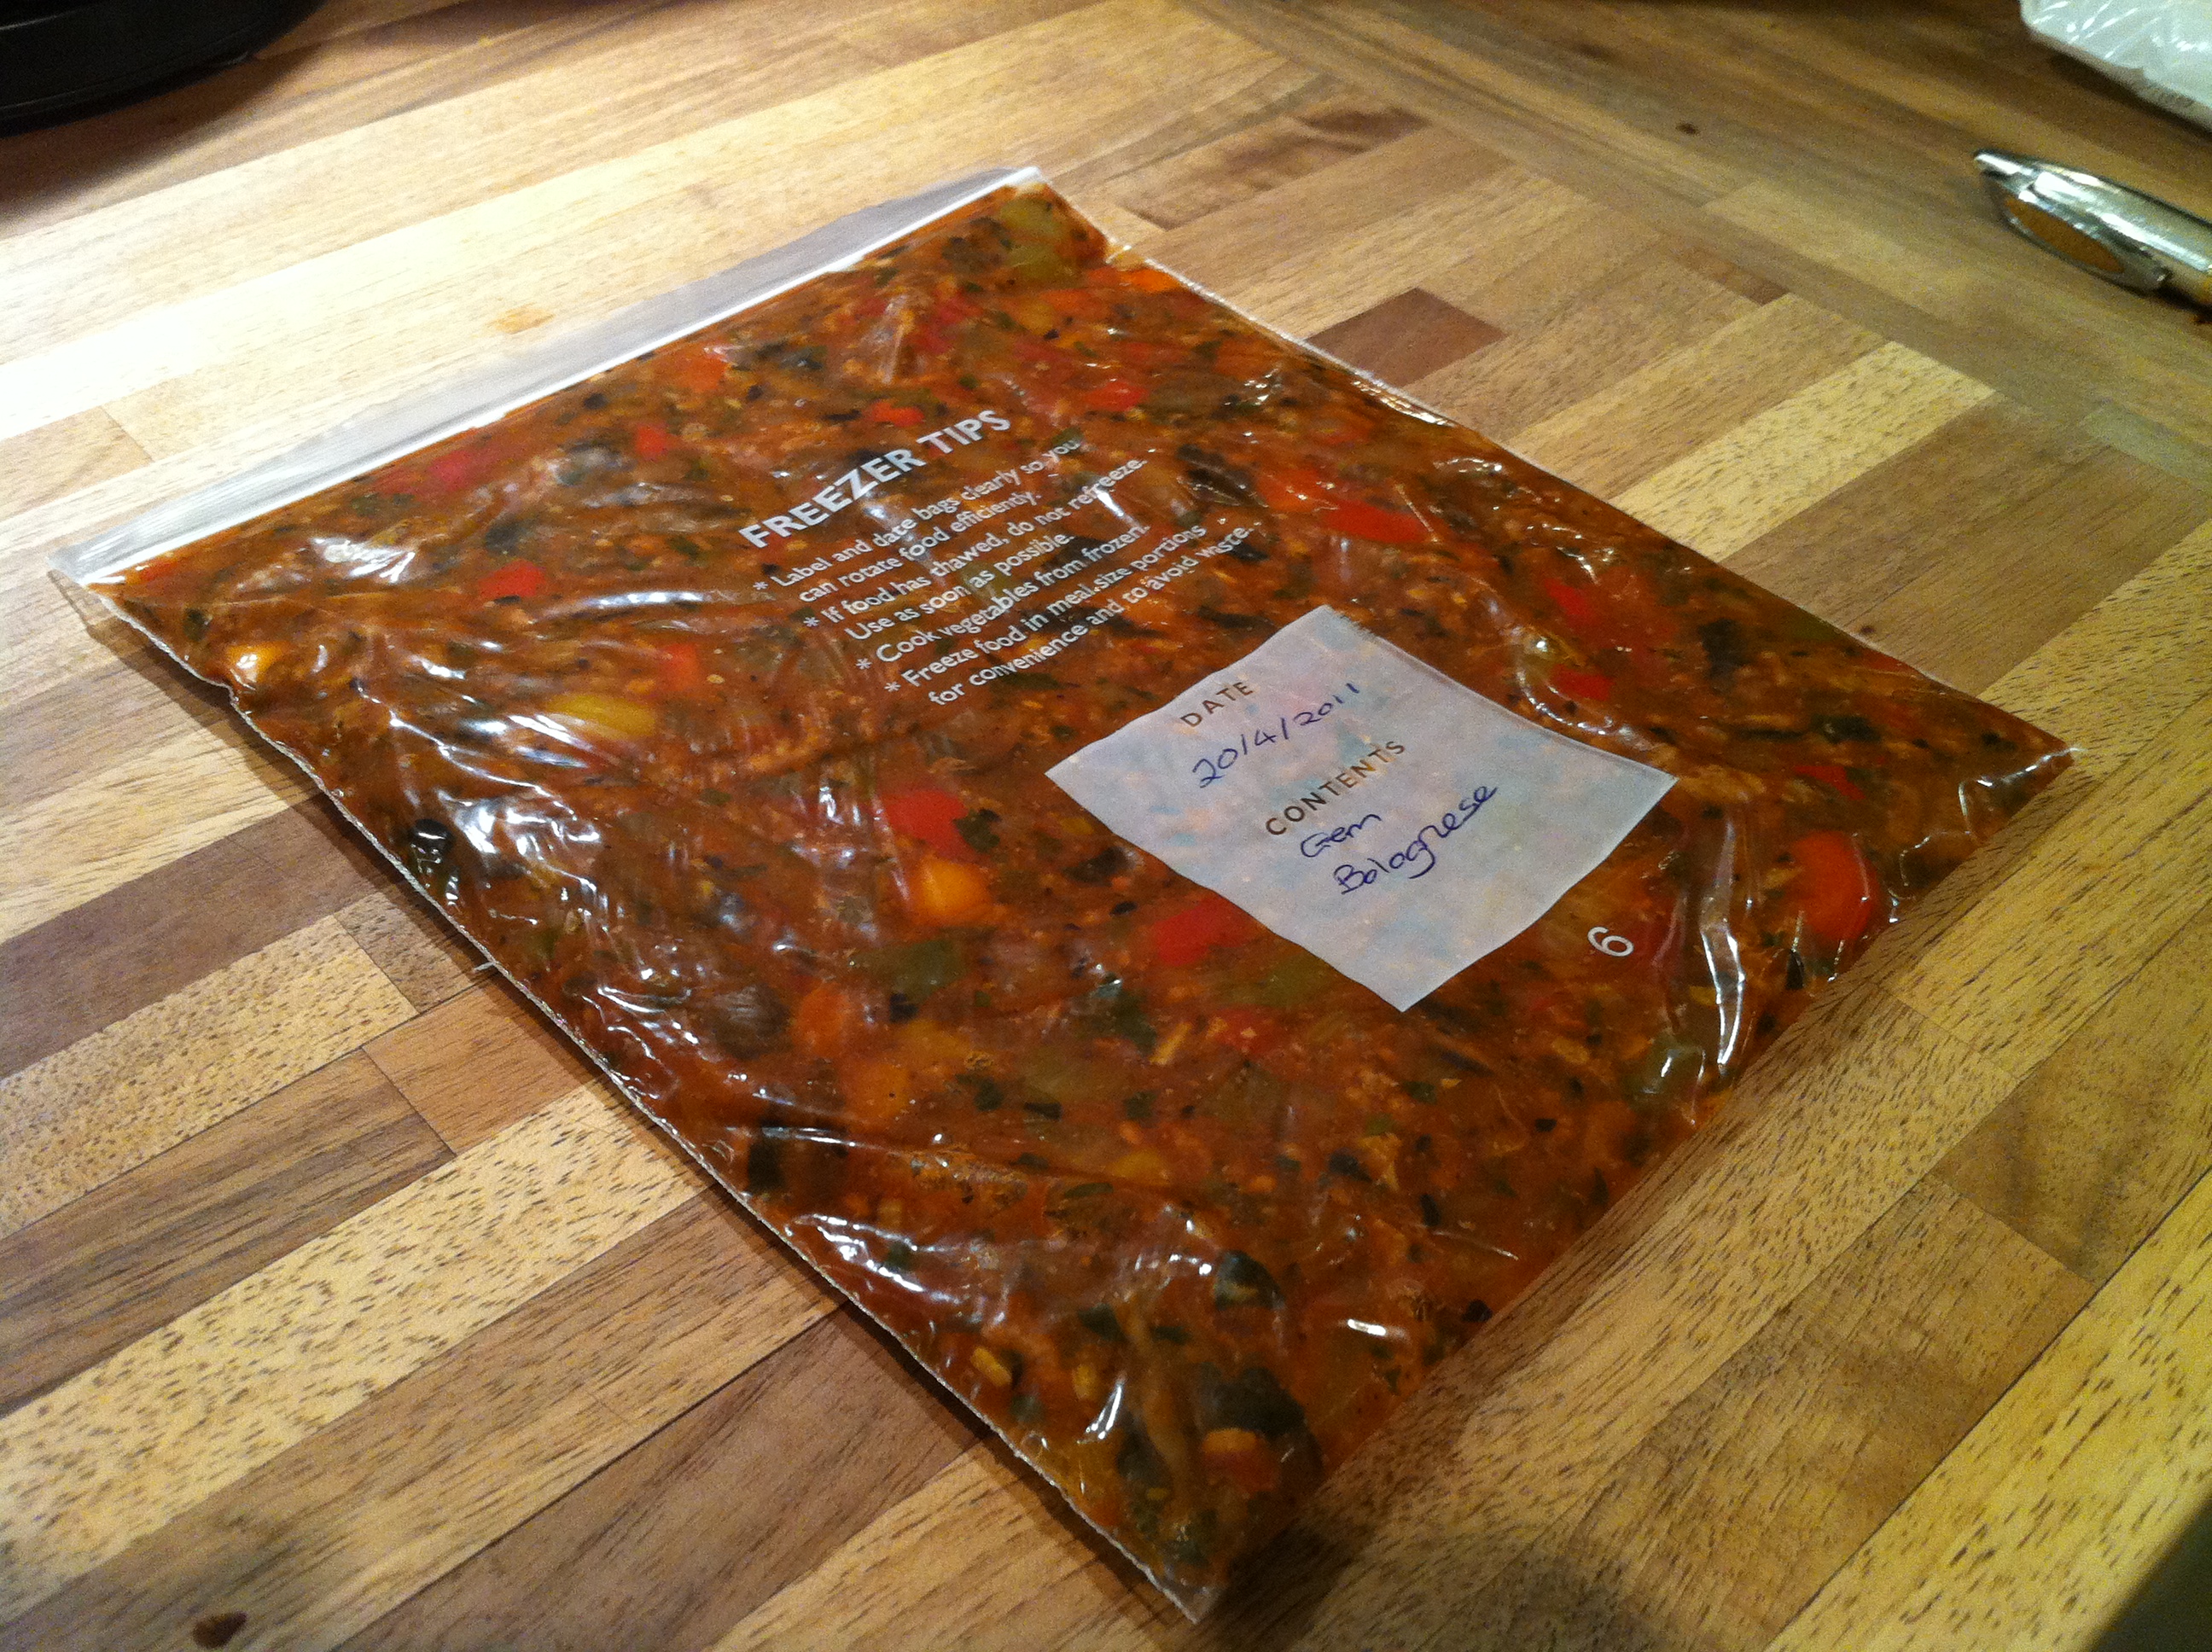
Tip #6: Use freezer bags
As always, get yourself prepared and ready to be industrious. Get your freezer bags ready, I normally use the small sandwich bags with zip lock strips across the top as they hold a good portion size, are easy to handle and the zip locks are very reliable.
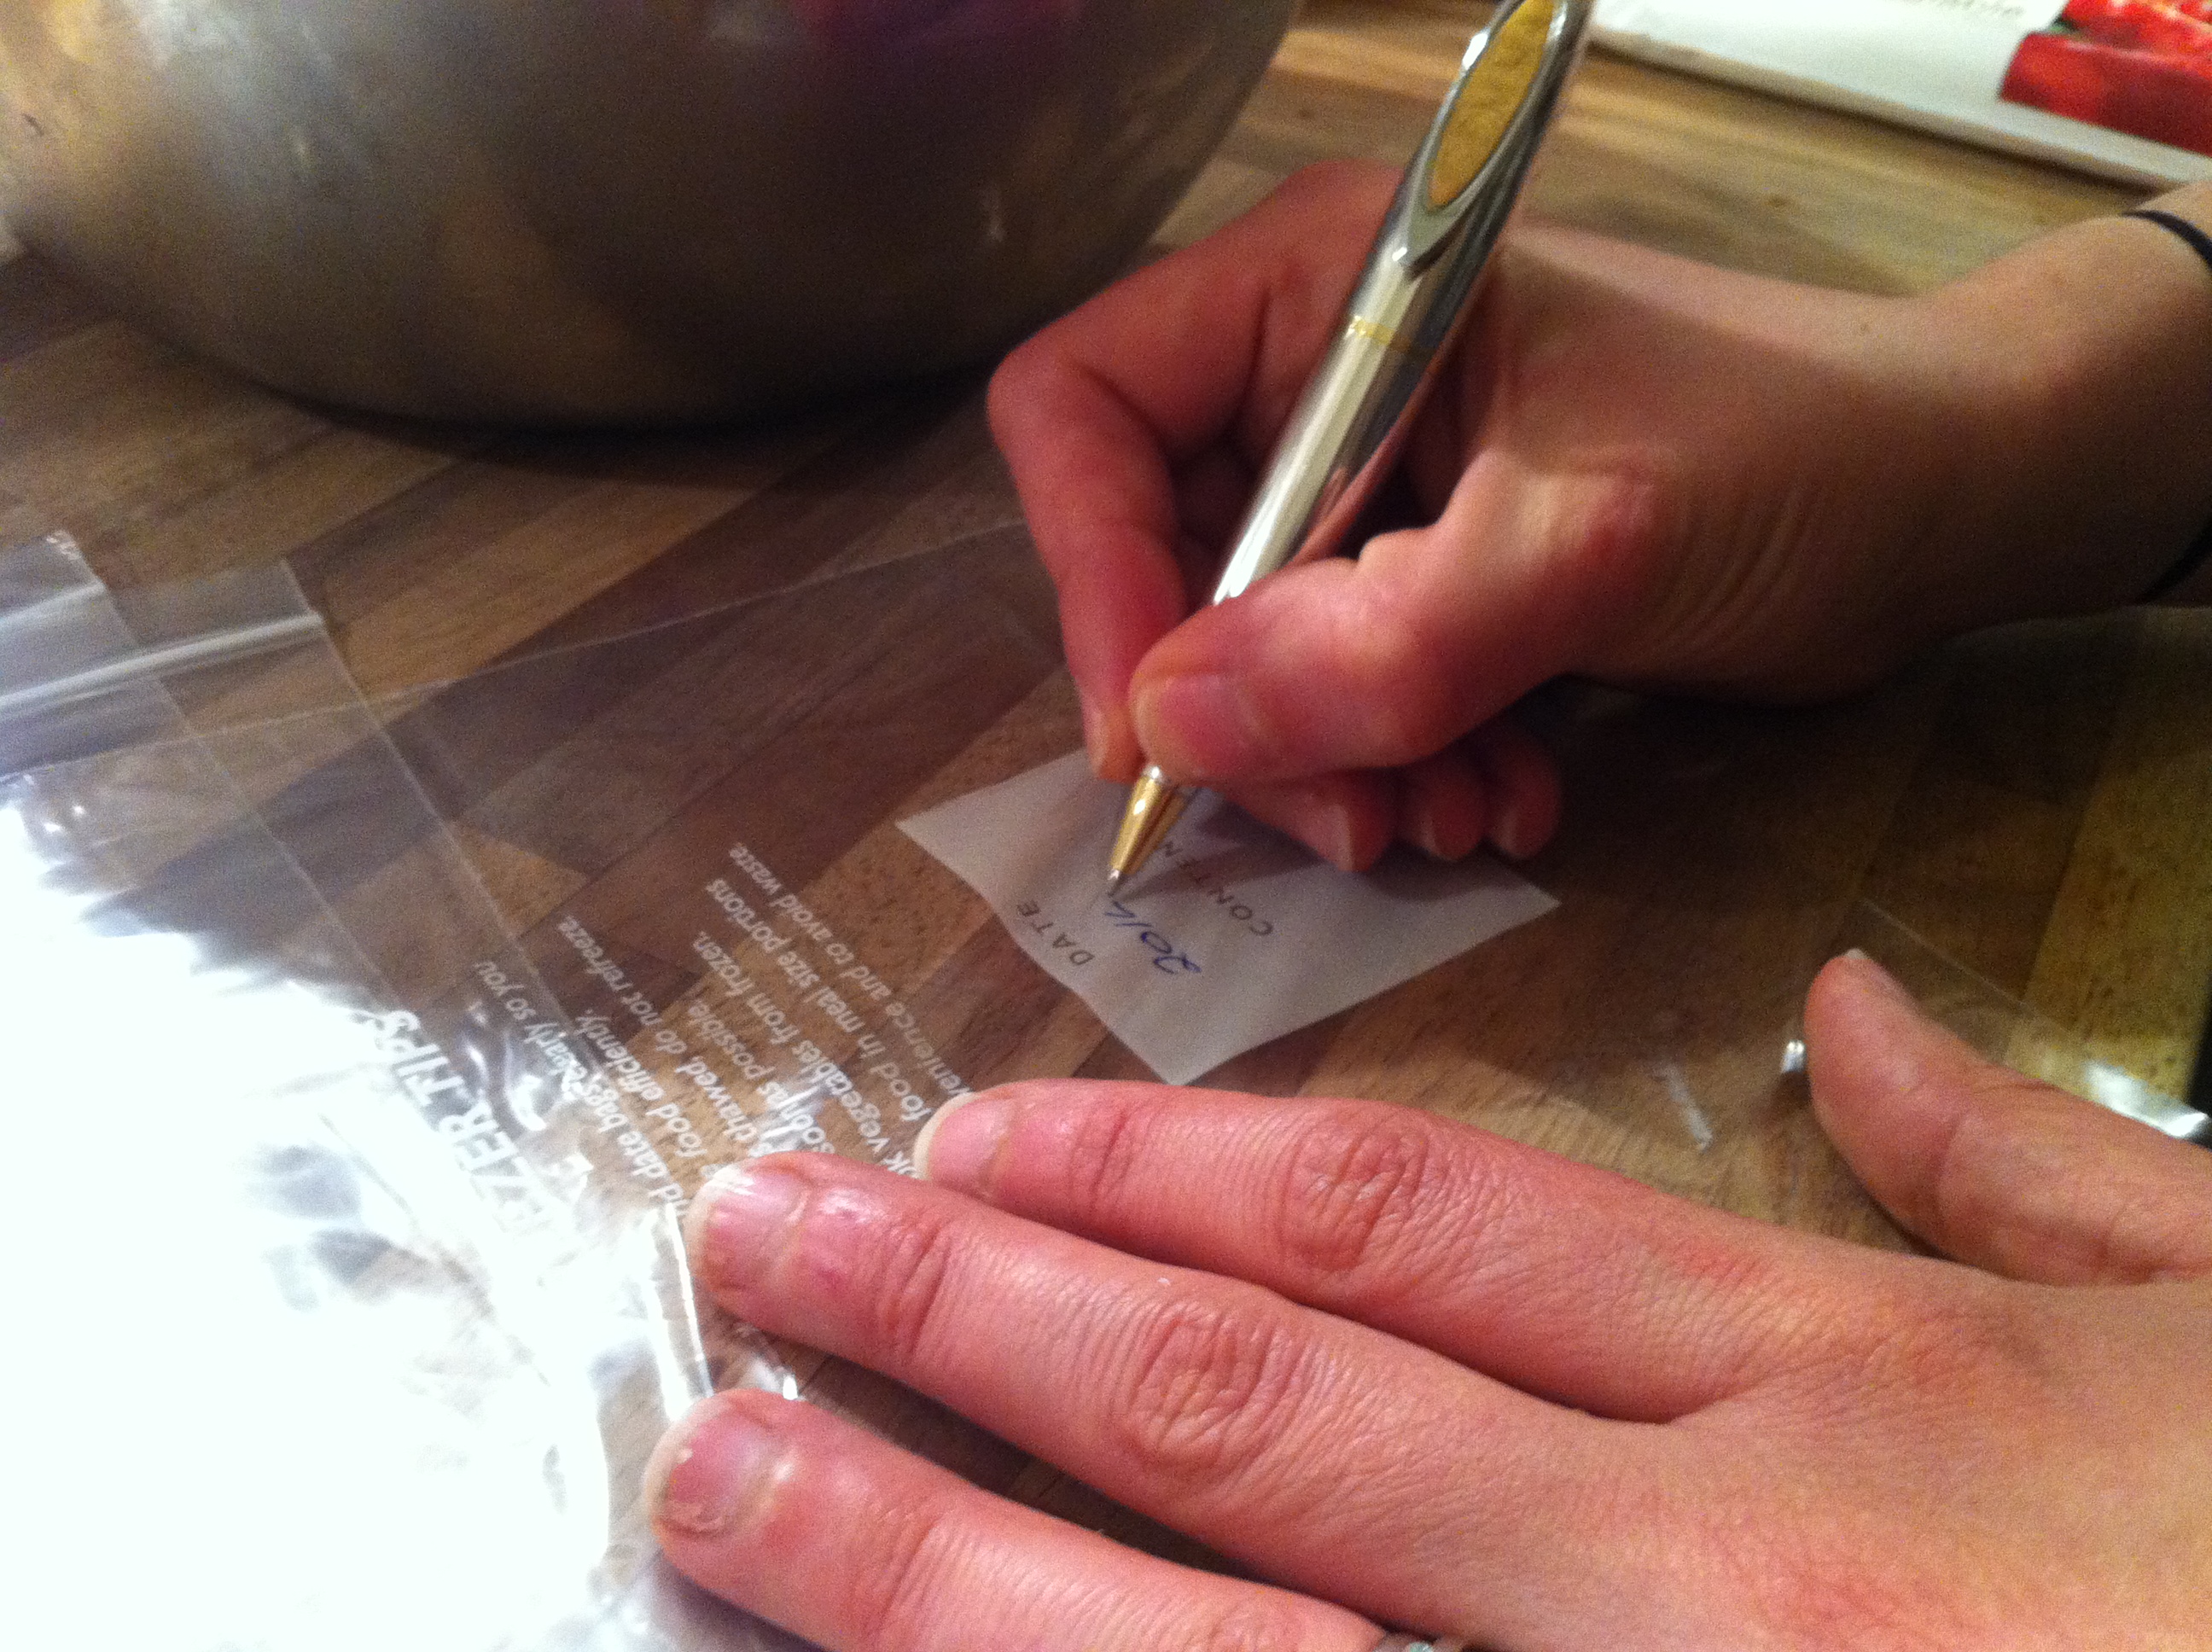
Tip #7: Date and label them
Most importantly, write the date on each bag and what the contents are. This bolognese might be in your freezer for 6 months so you’ll want a reminder as to what it is and when you made it, that is if you’ve got a memory as bad as mine you will ;o)
When your bags are all written and ready to go, fold each bag over your hand to make filling easier and ladle in a portions worth. Portion size i’ll leave to you, but for me about a good ladle should do it.
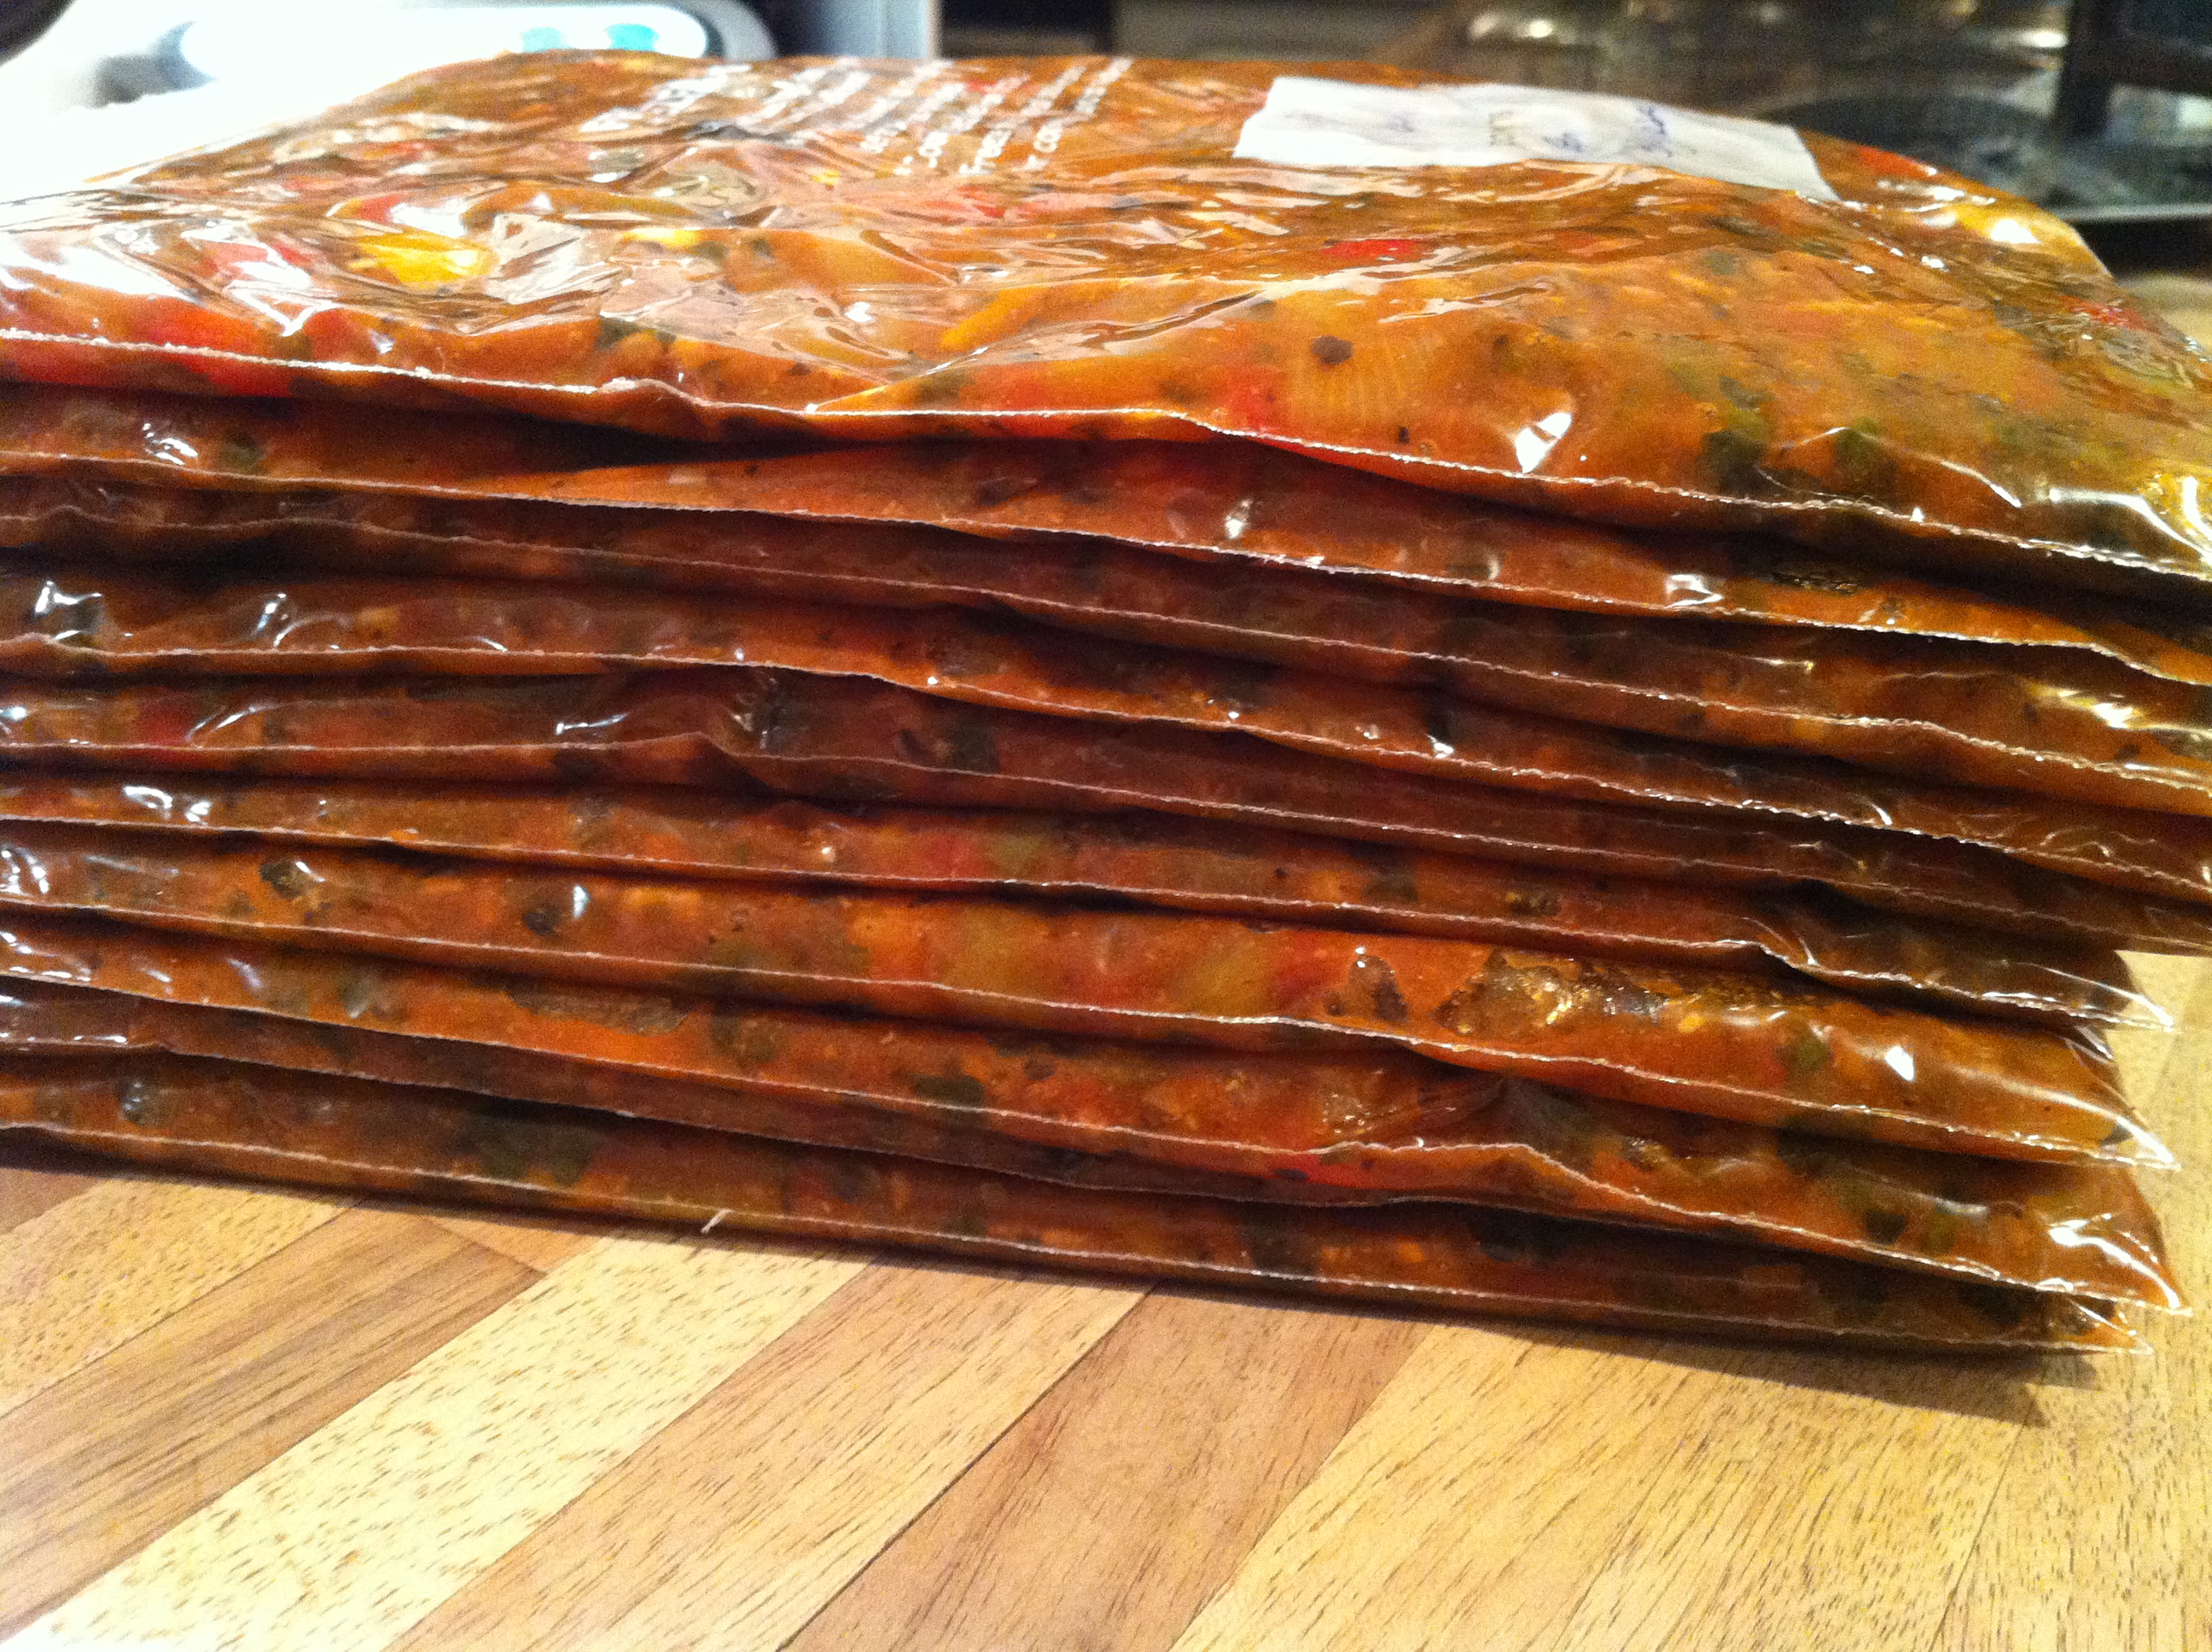
Tip #8: Freeze flat
Freeze ’em flat! Once you’ve put a portion of your bolognese into a freezer bag and sealed it shut, gently flatten the bag. You can then freeze your bolognese ‘pancakes’ in a stack, saving you freezer space.
Defrosting the sauce is also a doddle when they have been frozen flat, simply peal off a layer from the stack, give it a quick run under the tap, making it flexible enough to snap, then break it into pieces into a bowl ready for microwaving. No more getting a big frozen bolder of bolognese out of the freezer the night before!
Well, that concludes my guest appearance on the fabulous bigspud.co.uk. I hope my ramblings have given you a little food for thought – pun intended – and of course you can use the same principles outlined above whether you’re making, stews, curries or anything else.
It’s great having a delicious, home-cooked, meal available in the time it takes to boil some pasta or make some rice. I recommend batch cooking to everyone,and this batch cooked bolognese is a great way to get started.